Bringing SwiftUI Picker into .NET MAUI
Hello to fellow .NET developers. If we want to bring modern SwiftUI components into MAUI then there is no direct way. I really like the native SwiftUI pickers and the flexibility they provide creating a great UX. We have the old Wheel based picker in .NET MAUI. In this article we will explore how to bring native SwiftUI picker into .NET MAUI.
This article is created as a part of the annual .NET MAUI UI July community event, where developers from around the world share blog posts and videos showcasing ideas, techniques, and projects built with .NET MAUI throughout July. Learn more about the event here: .NET MAUI UI July 2026.
Content Index
I. SwiftUI Picker library
In order to use the SwiftUI native picker we first need to pack it into a framework library so that Objective Sharpie or swift-dotnet-bindings can use it to parse into Native Library Interop which .NET understands.
- Open Xcode
- Create new project > Choose Framework under Frameworks & Library section
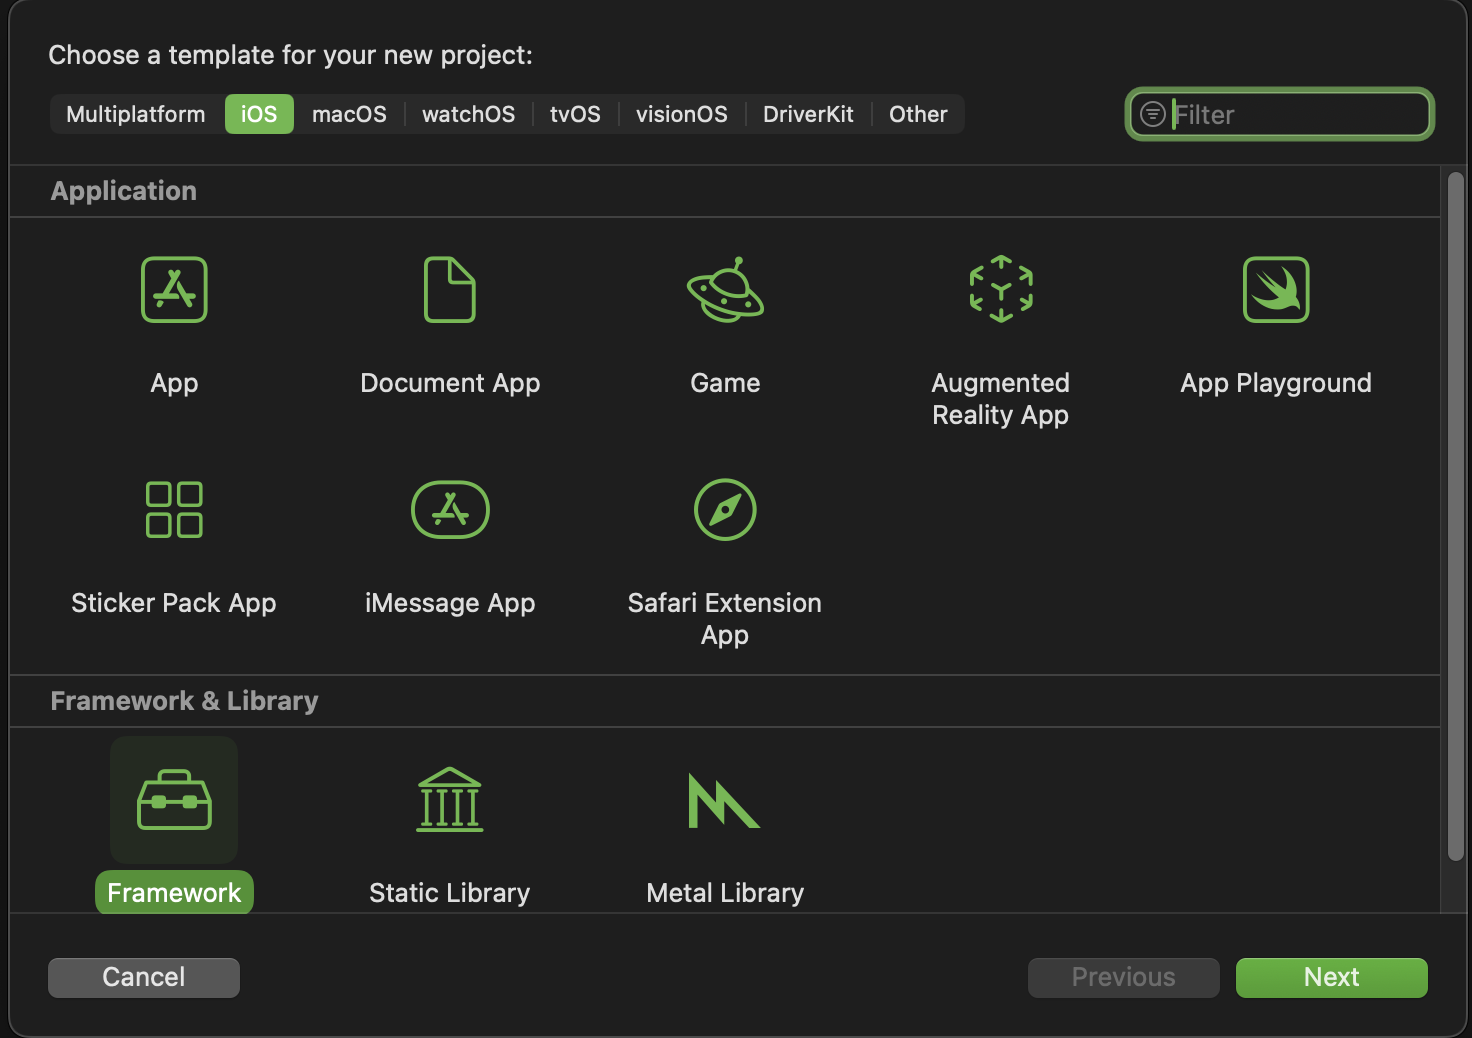
- Give it a name and choose a location to save.
- Create
- Under Project Targets > General, keep only iOS and iPad and delete the rest, unless you want to support those platforms as well.
- Lower the minimum deployments to iOS 15 or something, I am choosing 15 because that is the least Xcode allows me to.
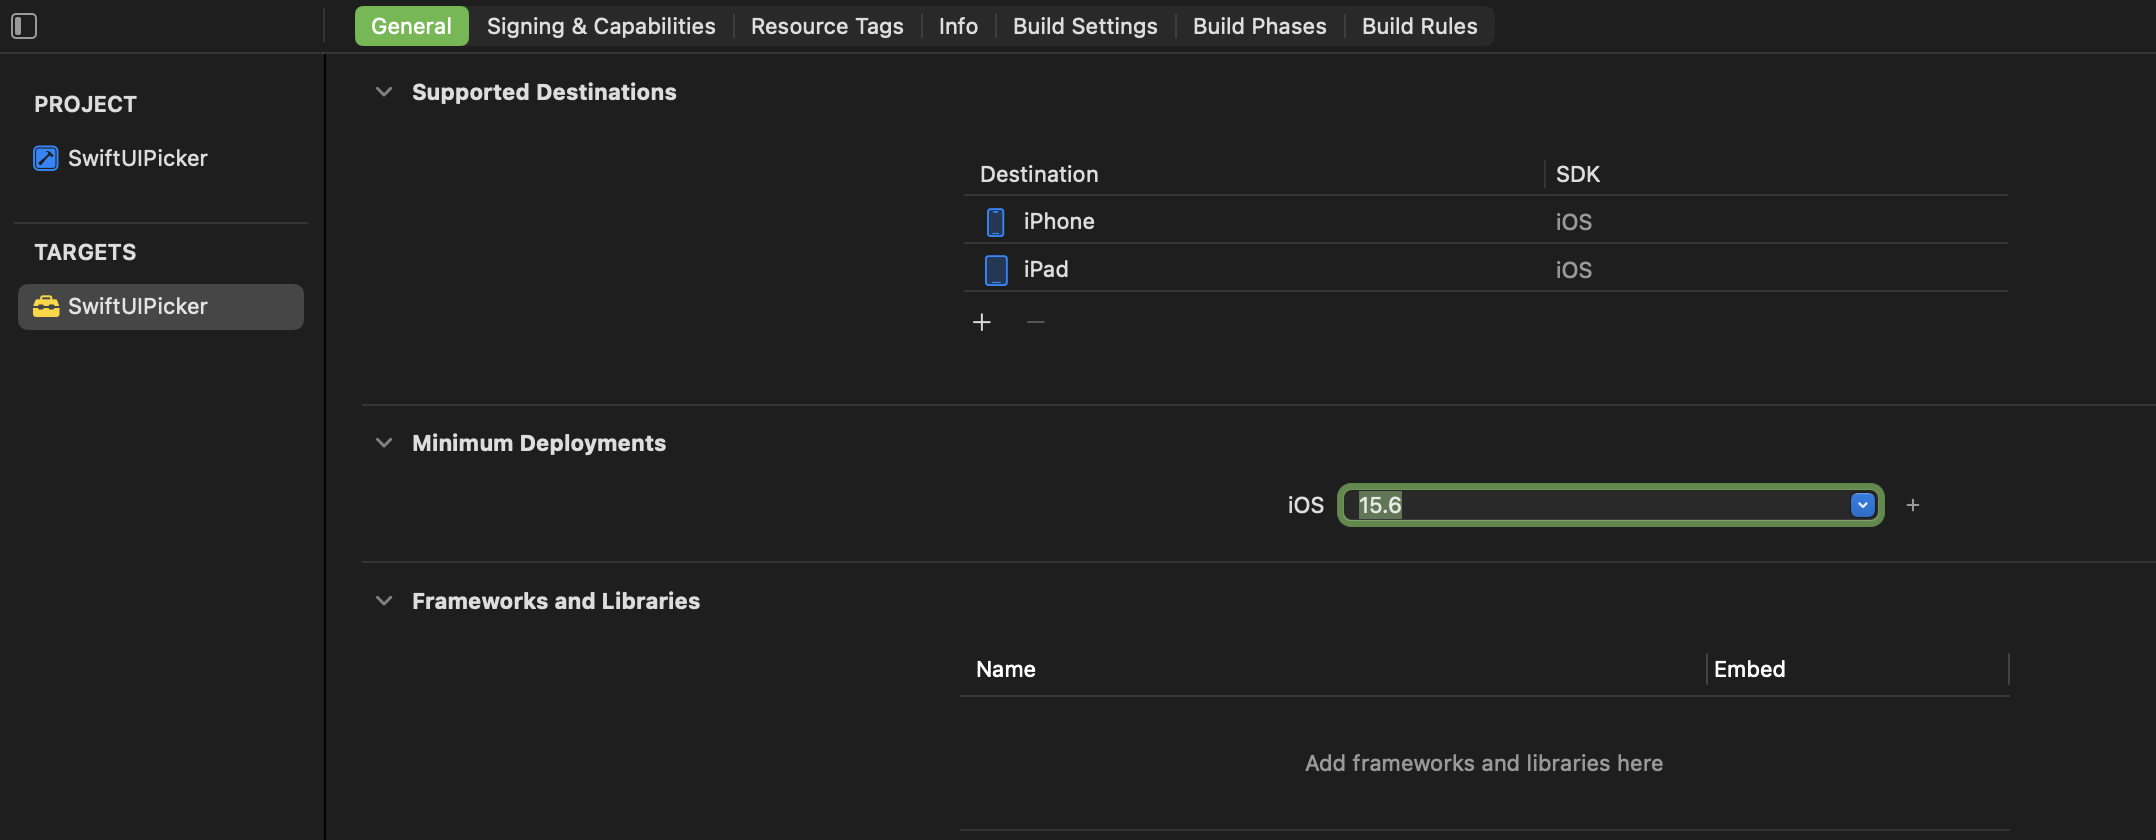
-
Add SwiftUI file and code for Picker. I am calling it
NativePickerand adding simple implementation.public struct NativePicker: View { // MARK: - Properties let items: [String] let title: String let style: NativePickerStyle @Binding var selectedItem: String // MARK: - Init public init(title: String, items: [String], selectedItem: Binding<String>, style: NativePickerStyle) { self.items = items self.title = title self.style = style _selectedItem = selectedItem } // MARK: - Template var pickerContent: some View { Picker(title, selection: $selectedItem) { ForEach(items, id: \.self) { Text($0) } } } public var body: some View { switch style { case .segmented: pickerContent.pickerStyle(.segmented) case .inline: pickerContent.pickerStyle(.inline) case .menu: pickerContent.pickerStyle(.menu) case .wheel: pickerContent.pickerStyle(.wheel) case .palette: if #available(iOS 17.0, *) { pickerContent.pickerStyle(.palette) } else { pickerContent.pickerStyle(.automatic) } case .navigationLink: if #available(iOS 16.0, *) { NavigationStack { pickerContent.pickerStyle(.navigationLink) } } else { pickerContent.pickerStyle(.automatic) } case .automatic: pickerContent.pickerStyle(.automatic) } } }Note the
publicaccess modifier so the view is visible outside its module. This is needed by the binding generator (and the bridge) to constructNativePickerfrom outsideSwiftUIPicker. Without it,NativePicker, includingselectedItemwould default tointernaland be invisible to the generated C# bindable property. Making a structpublicdoes not automatically make its memberwise initializerpublic, we would need to write an explicitpublic init.Also note that
PickerStyle.navigationLinkis available for iOS 16 and higher, similarlyPickerStyle.paletteis available for iOS 17 and higher. So fallbacks are set to bePickerStyle.automatic. -
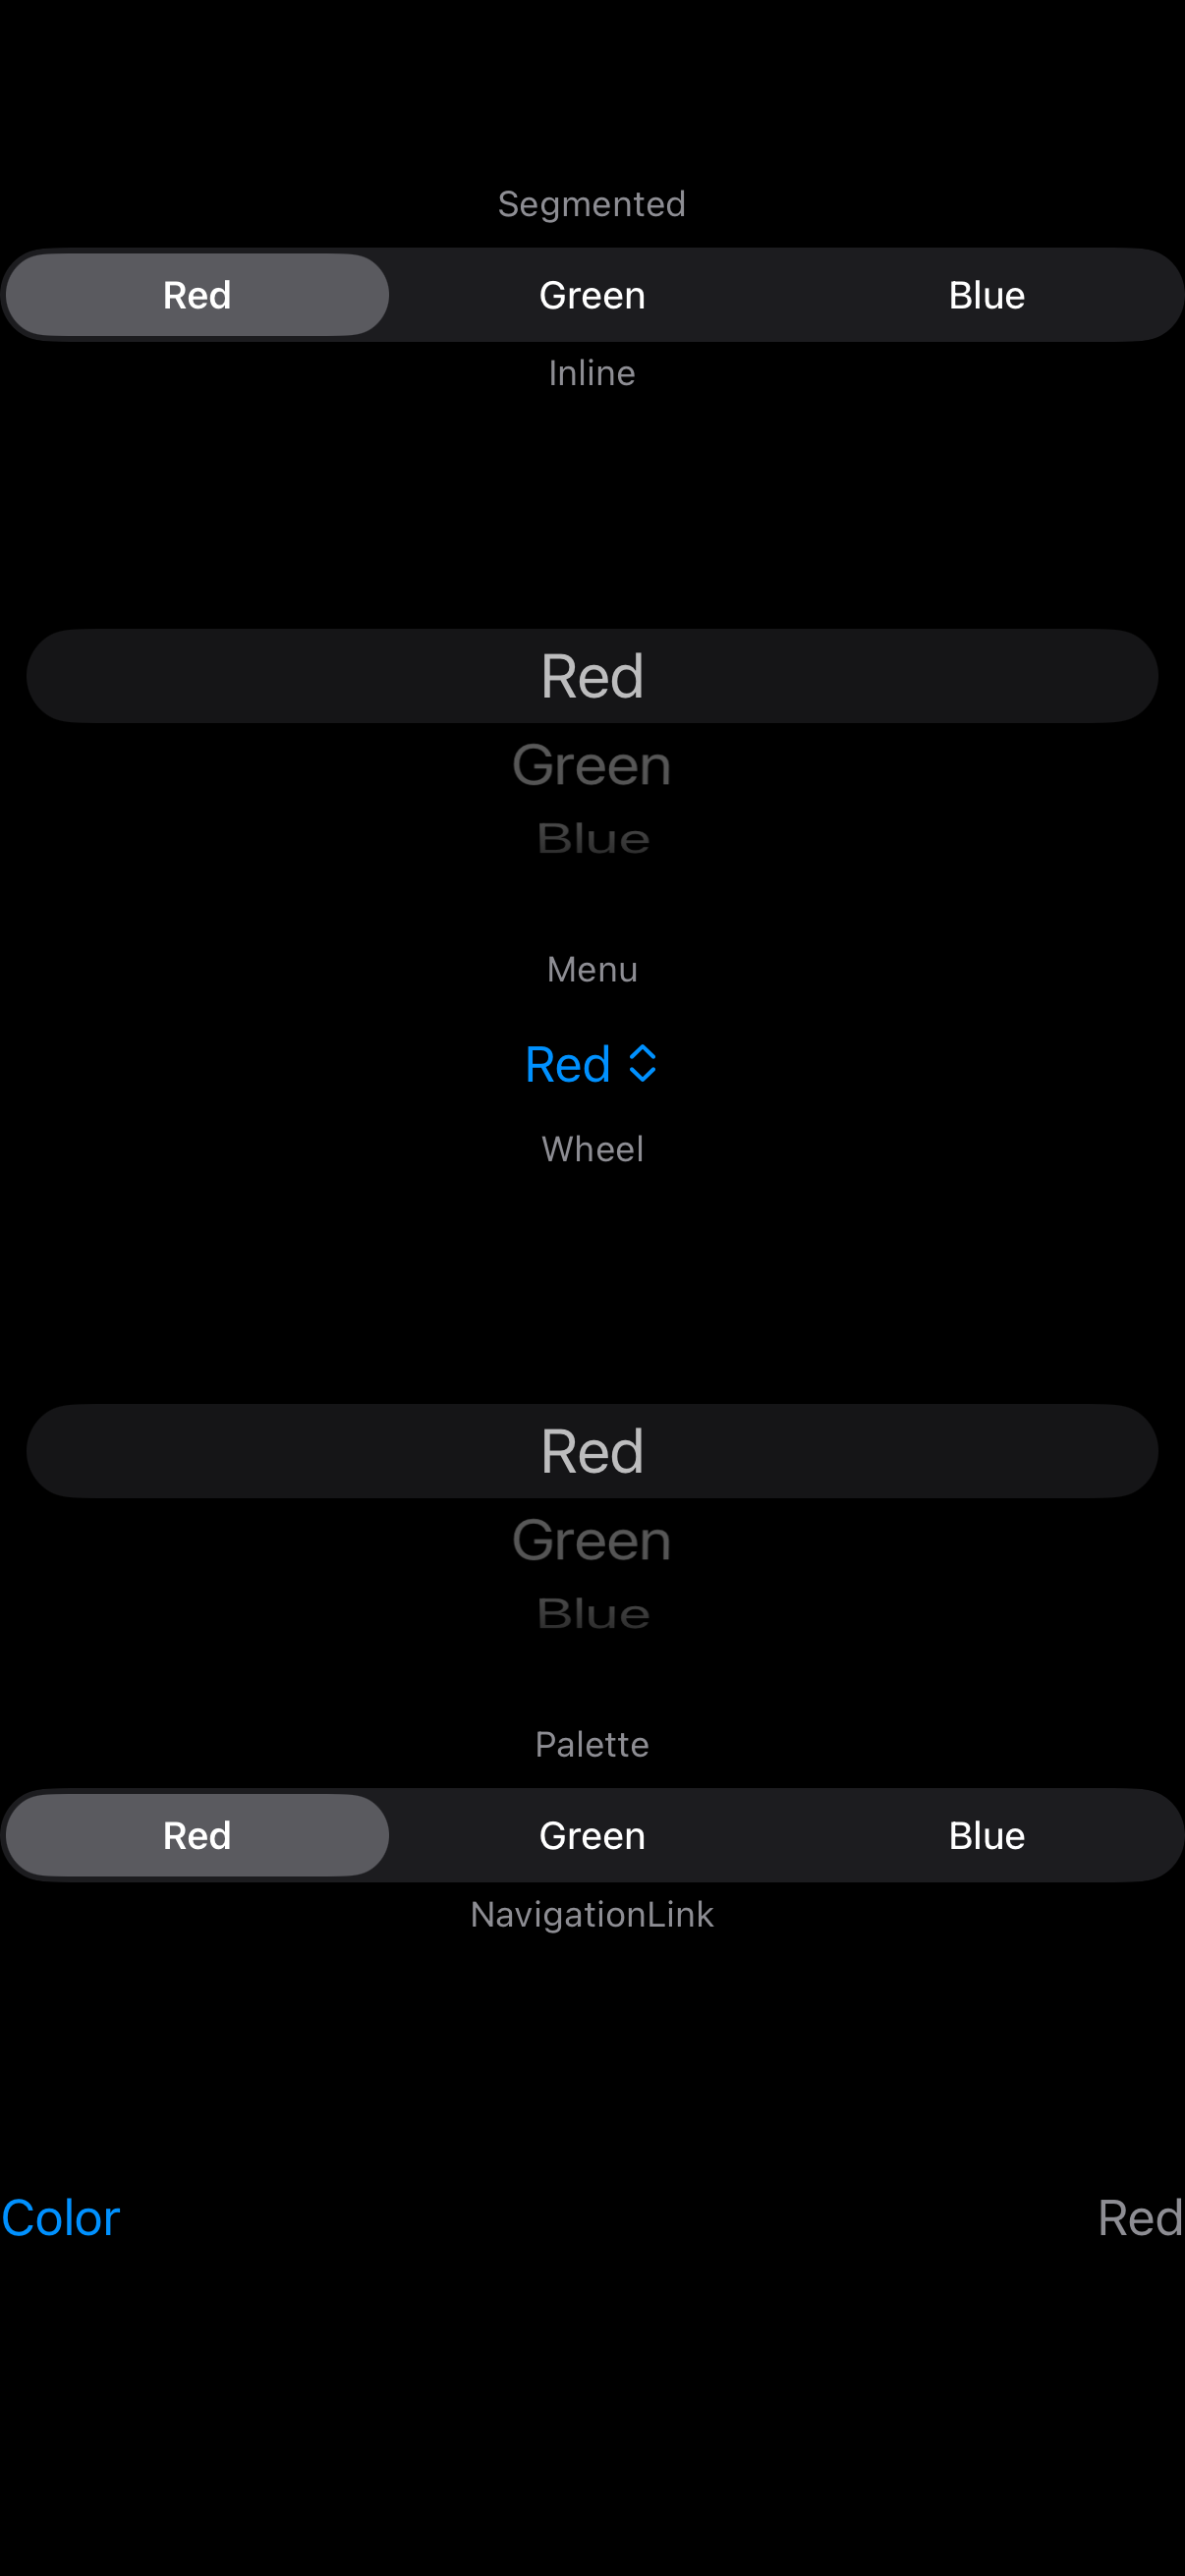
Also quickly verify that it works by adding previews.
 #Preview {
     Group {
         Text("Segmented")
             .font(.caption)
             .foregroundStyle(.secondary)
         NativePicker(title: "Color",
                         items: ["Red", "Green", "Blue"],
                         selectedItem: .constant("Red"),
                         style: .segmented)
     }
     Group {
         Text("Inline")
             .font(.caption)
             .foregroundStyle(.secondary)
         NativePicker(title: "Color",
                         items: ["Red", "Green", "Blue"],
                         selectedItem: .constant("Red"),
                         style: .inline)
     }
     Group {
         Text("Menu")
             .font(.caption)
             .foregroundStyle(.secondary)
         NativePicker(title: "Color",
                         items: ["Red", "Green", "Blue"],
                         selectedItem: .constant("Red"),
                         style: .menu)
     }
     Group {
         Text("Wheel")
             .font(.caption)
             .foregroundStyle(.secondary)
         NativePicker(title: "Color",
                         items: ["Red", "Green", "Blue"],
                         selectedItem: .constant("Red"),
                         style: .wheel)
     }
     Group {
         Text("Palette")
             .font(.caption)
             .foregroundStyle(.secondary)
         NativePicker(title: "Color",
                         items: ["Red", "Green", "Blue"],
                         selectedItem: .constant("Red"),
                         style: .palette)
     }
     Group {
         Text("NavigationLink")
             .font(.caption)
             .foregroundStyle(.secondary)
         NativePicker(title: "Color",
                         items: ["Red", "Green", "Blue"],
                         selectedItem: .constant("Red"),
                         style: .navigationLink)
     }
 }
-
We need to add
PickerBridgeso that Swift is interoped to UIKit which MAUI is more familiar with. Note that this acts as intermediator between binding value when it changed from UI to C# and vice versa. I decided against Sharpie. More on that later.public class PickerBridge: NSObject, ObservableObject { // MARK: - Properties @Published var selectedItem: String { didSet { onSelectionChanged?(selectedItem); refreshView() } } @Published var items: [String] { didSet { refreshView() } } @Published var title: String { didSet { refreshView() } } @Published var style: NativePickerStyle { didSet { refreshView() } } private var hostingController: UIHostingController<NativePicker>? private var onSelectionChanged: ((String) -> Void)? public var uiView: UIView? { hostingController?.view } // MARK: - Init public init(title: String, items: [String], selected: String, style: NativePickerStyle, onSelectionChanged: @escaping (String) -> Void) { self.items = items selectedItem = selected self.title = title self.style = style self.onSelectionChanged = onSelectionChanged super.init() hostingController = UIHostingController(rootView: makeView()) } private func makeView() -> NativePicker { let binding = Binding<String>(get: { self.selectedItem }, set: { self.selectedItem = $0 }) return NativePicker(title: title, items: items, selectedItem: binding, style: style) } private func refreshView() { hostingController?.rootView = makeView() } // MARK: - Handlers public func setSelected(_ item: String) { selectedItem = item } public func updateItems(_ newItems: [String]) { items = newItems } public func updateTitle(_ newTitle: String) { title = newTitle } public func updateStyle(_ newStyle: NativePickerStyle) { style = newStyle } } -
Now set Build Libraries for distribution to Yes
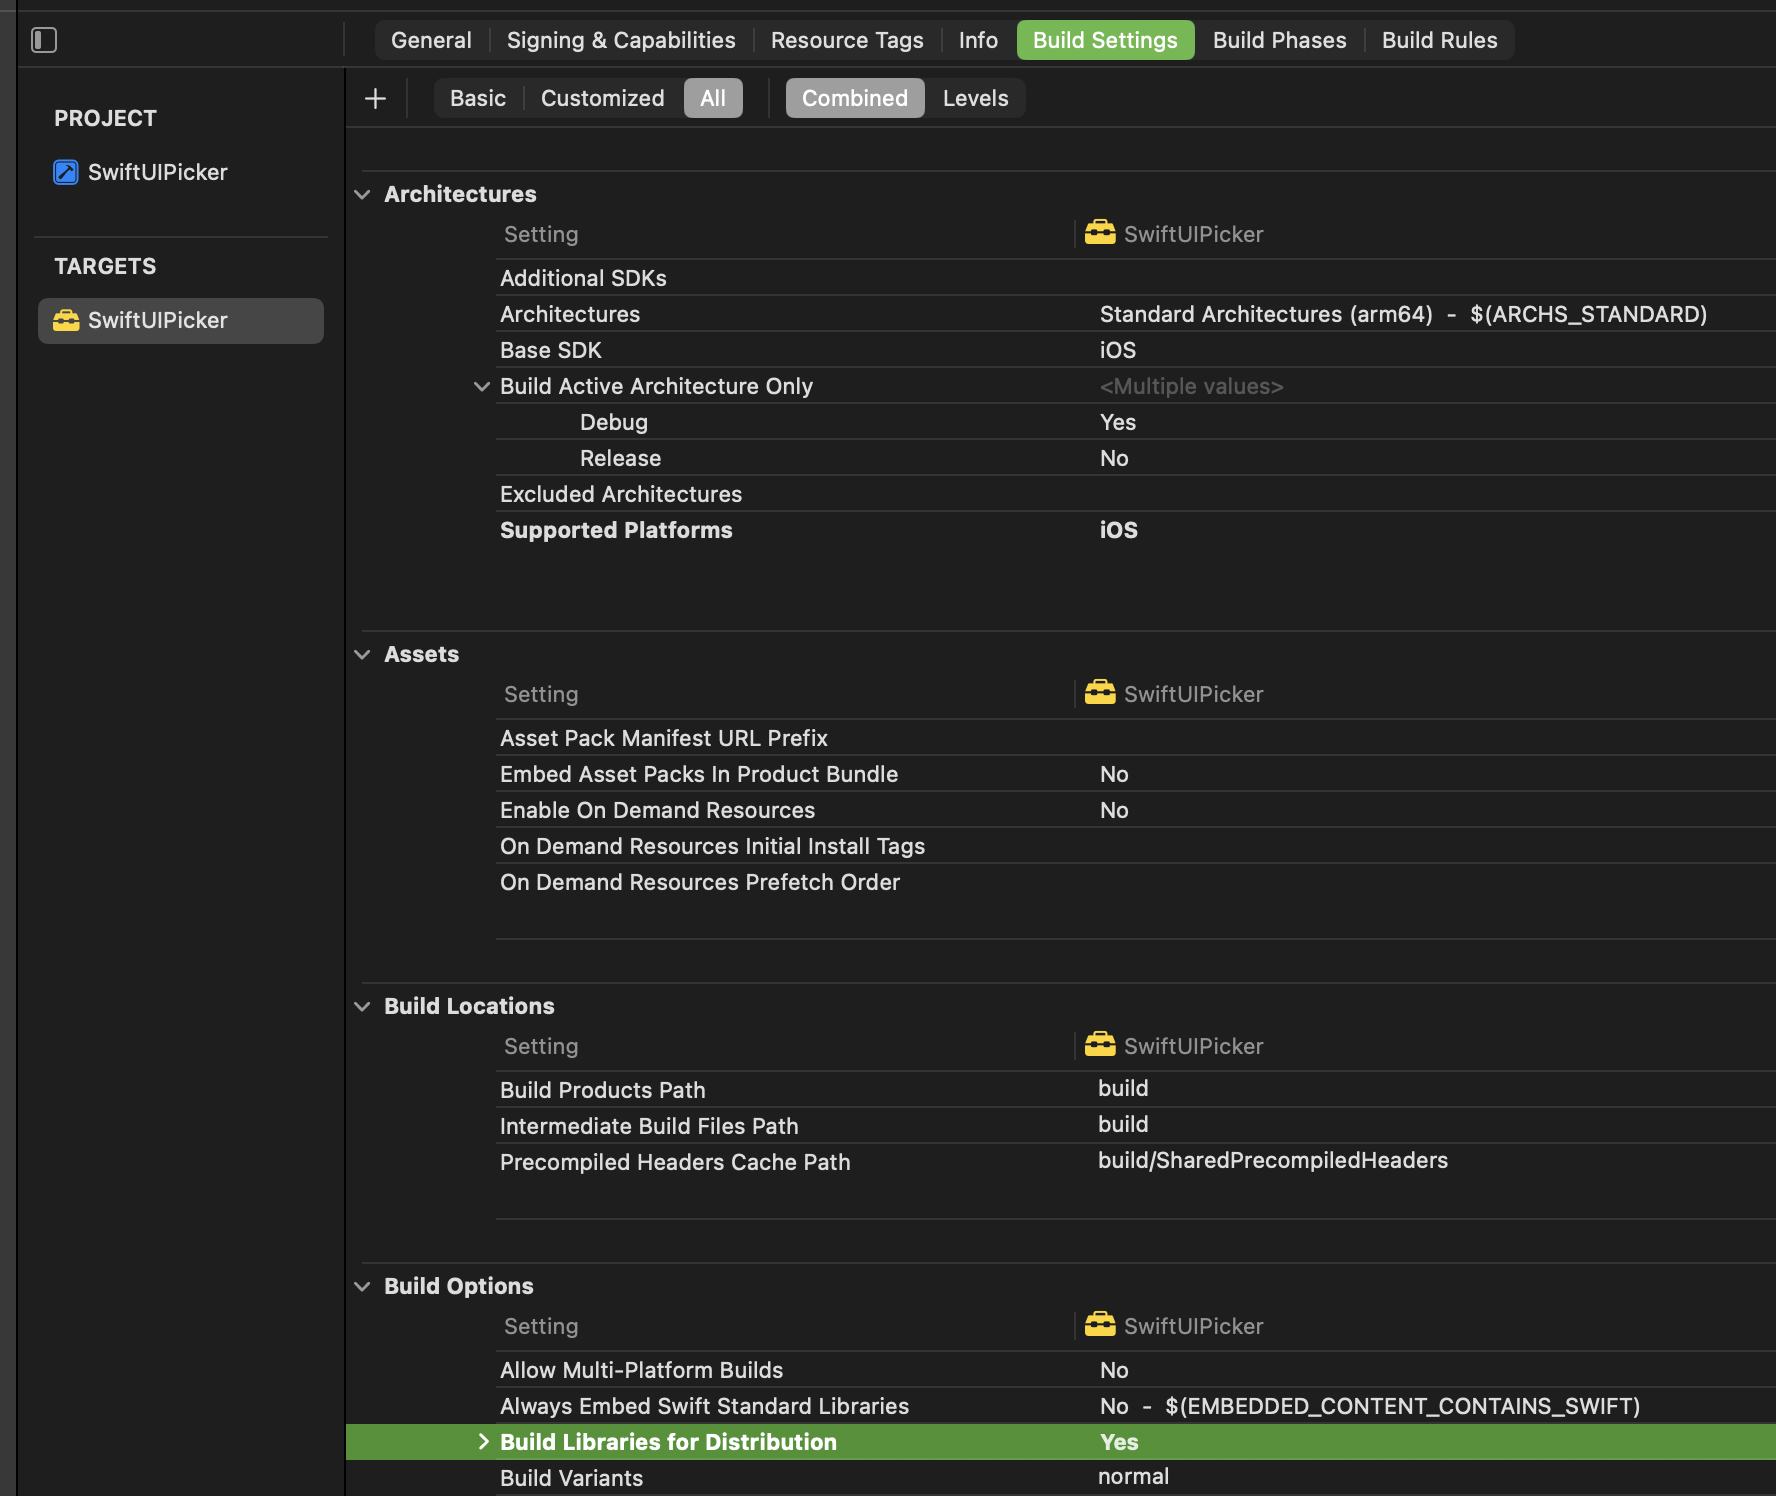
-
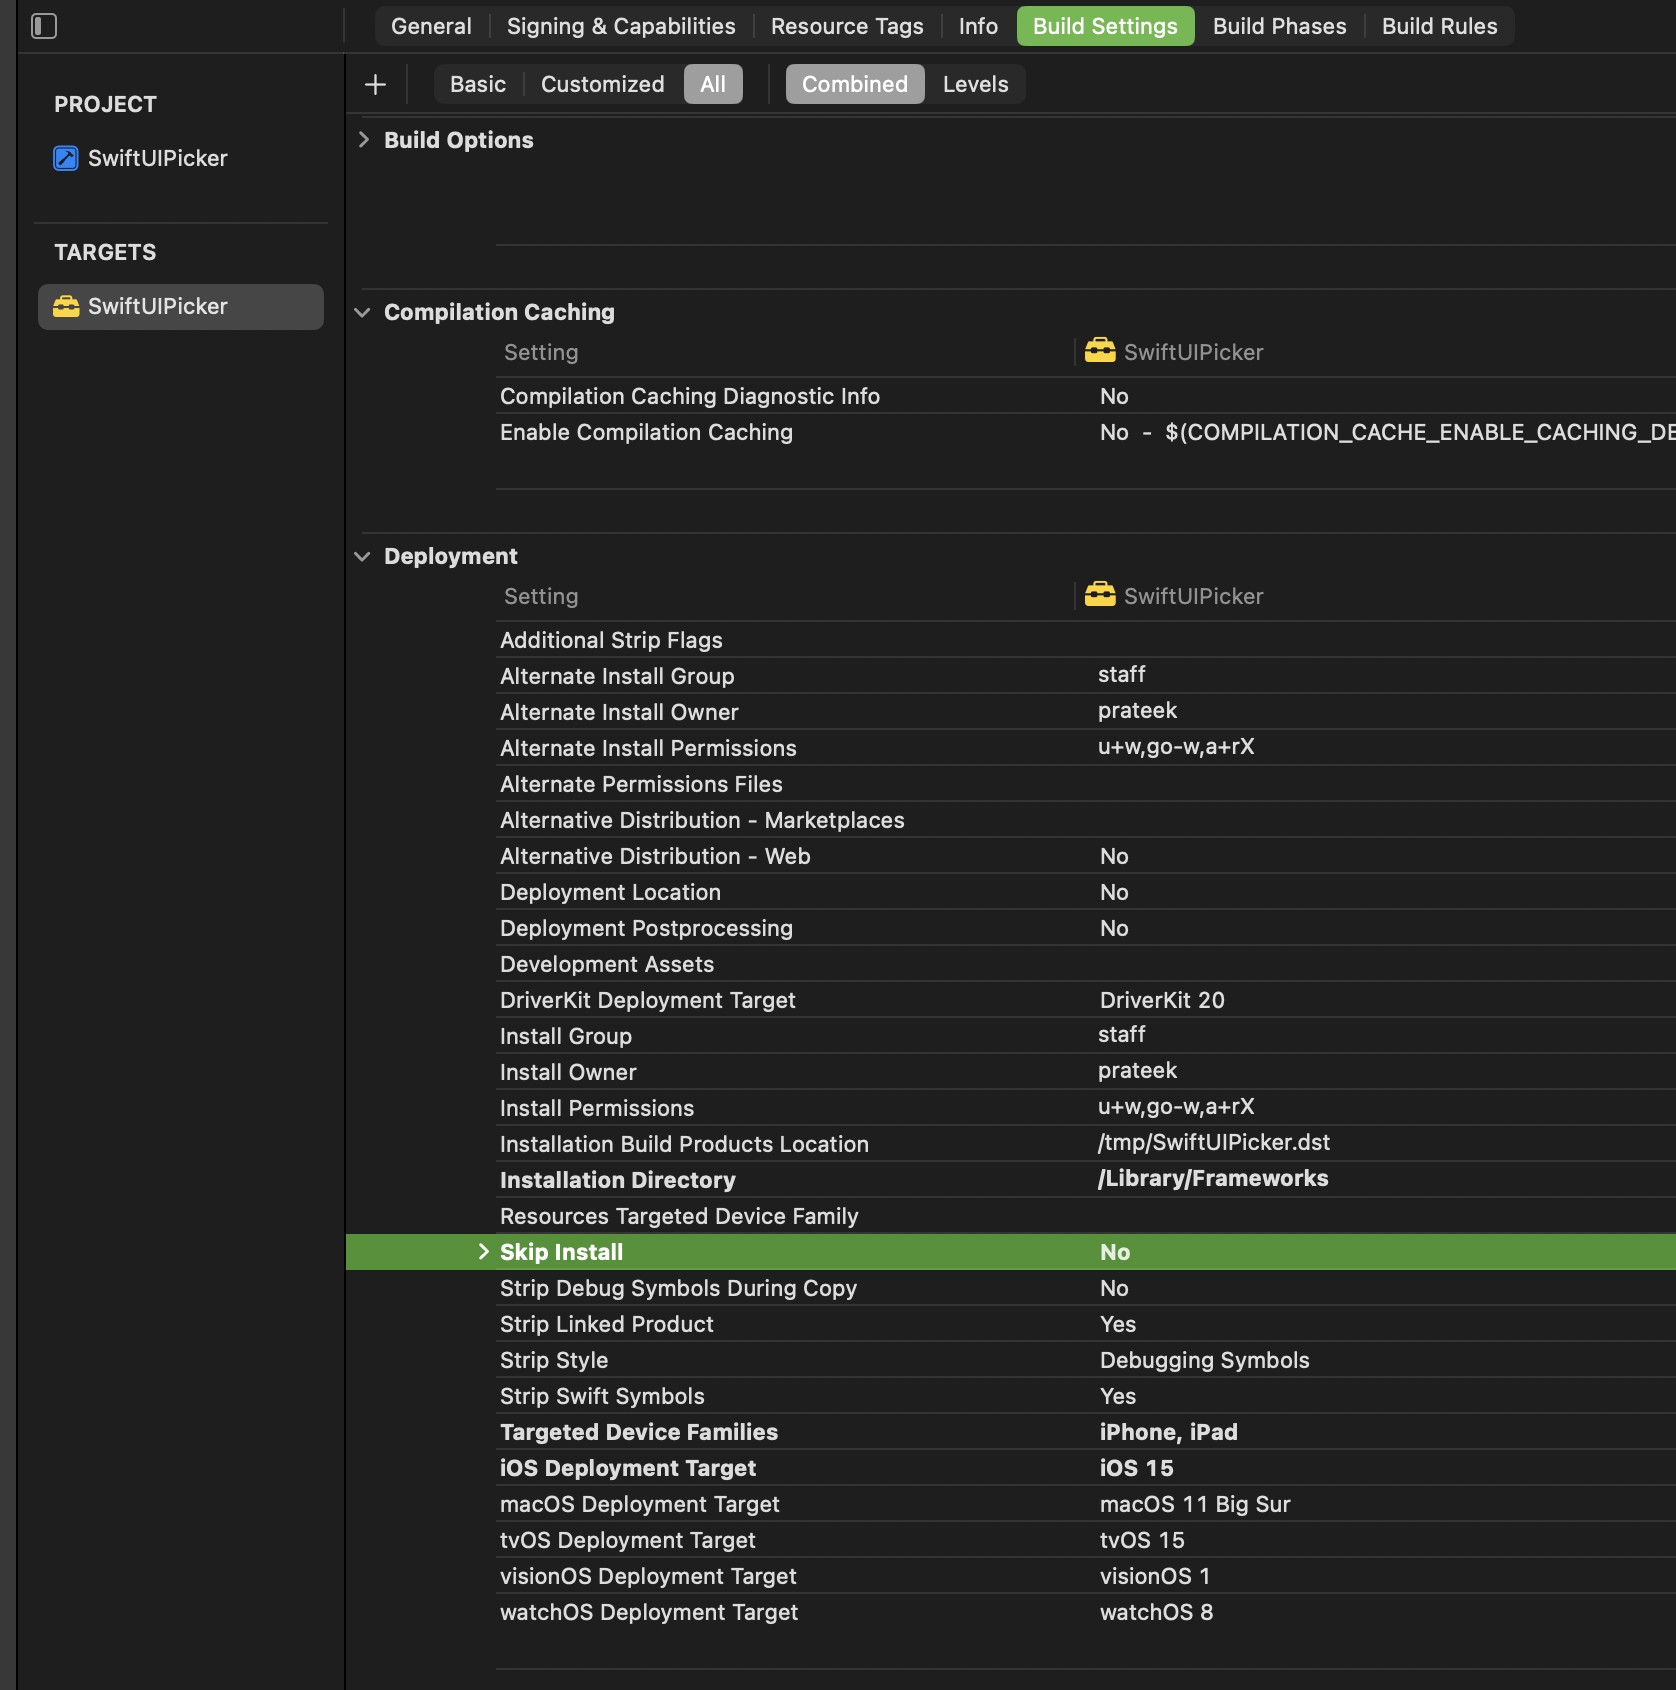
Set Skip install to No under Build Settings > Deployment
-
Now build the project for both simulator and iPhone targets so that it can run on them when we develop.
# Simulator xcodebuild archive -scheme SwiftUIPicker -destination "generic/platform=iOS Simulator" -archivePath build/sim.xcarchive SKIP_INSTALL=NO BUILD_LIBRARY_FOR_DISTRIBUTION=YES # iPhone xcodebuild archive -scheme SwiftUIPicker -destination "generic/platform=iOS" -archivePath build/ios.xcarchive SKIP_INSTALL=NO BUILD_LIBRARY_FOR_DISTRIBUTION=YES - Once these are completed, you will see two xcframework files in
buildfolder.
ios.xcarchive
sim.xcarchive
Now run the following command to combine them into single framework
xcodebuild -create-xcframework `
  -framework build/ios.xcarchive/Products/Library/Frameworks/SwiftUIPicker.framework `
  -framework build/sim.xcarchive/Products/Library/Frameworks/SwiftUIPicker.framework `
  -output build/SwiftUIPicker.xcframework
This will create our final framework library.
II. MAUI Binding Library
Initially tried Objective Sharpie but soon started getting ‘header not present in framework’ error. I could not figure out project setting which makes it generate for newer Xcode. So solution was to find header files in ~/Library/Developer/Xcode/DerivedData and manually copy and rebuild framework file.
Instead I wanted to try out swift-dotnet-bindings and it made the process easier.
Here are just 5 simple steps as opposed to manually updating ApiDefinitions & Enums after Sharpie Bind and scratching my head with trial and error, which is why I ended up not using Sharpie.
-
Install the template.
dotnet new install SwiftBindings.Templates -
Create a C# iOS binding project.
dotnet new swift-binding -n SwiftUIPickerMauiBindings -
Drop in the
SwiftUIPicker.xcframeworkgenerated earlier inside SwiftUIPickerMauiBindings folder. -
Build
dotnet build ./SwiftUIPickerMauiBindings.csprojThis will generate SwiftUIPickerMauiBindings.dll in
binfolder. We can use ilspy-vscode VS Code extension to decompile and inspect binding classes generated. -
Pack
dotnet pack ./SwiftUIPickerMauiBindings.csprojThis will generate nuget package in
bin/Releasefolder which we can install in our MAUI project to use. I did not even need to enter details for nuget info. If we make changes and regenerate it is better to increment version with--version <version>argument so that dotnet does not use cached nuget.
Note: The library claims that it auto generates bridge files but when I removed PickerBridge it did not generate C# class, there was
*.bridgefile in obj folder which required further manual edits to make to work. Moreover SwiftUI’s Picker selection binding is built on aWritableKeyPathinternally: a Swift mechanism for referencing a mutable property path which the binding generator’s auto-bridge feature doesn’t support, so I kept the hand-writtenPickerBridgeinstead.
III. Using MAUI bound SwiftUI Picker
Now we are at the final stage.
-
Create .NET MAUI project.
dotnet new maui -f net10.0 -n MauiSwiftUiPicker -
Remove Windows and Mac-Catalyst targets unless you want to support them.
<PropertyGroup> <TargetFrameworks>net10.0-android</TargetFrameworks> <TargetFrameworks Condition="!$([MSBuild]::IsOSPlatform('linux'))">$(TargetFrameworks);net10.0-ios</TargetFrameworks> <!-- Other csproj settings --> <SupportedOSPlatformVersion Condition="$([MSBuild]::GetTargetPlatformIdentifier('$(TargetFramework)')) == 'ios'">15.6</SupportedOSPlatformVersion> <SupportedOSPlatformVersion Condition="$([MSBuild]::GetTargetPlatformIdentifier('$(TargetFramework)')) == 'android'">21.0</SupportedOSPlatformVersion> </PropertyGroup> -
Install MAUI binding nuget to the project.
dotnet add package SwiftUIPickerMauiBindings --source ../SwiftUIPickerMauiBindings/bin/Release - Now verify that the project builds fine.
-
Add picker custom control.
public class NativePicker : View { public static readonly BindableProperty TitleProperty = BindableProperty.Create(propertyName: nameof(Title), returnType: typeof(string), declaringType: typeof(NativePicker), defaultValue: string.Empty); public string Title { get => (string)GetValue(TitleProperty); set => SetValue(TitleProperty, value); } public static readonly BindableProperty ItemsSourceProperty = BindableProperty.Create(propertyName: nameof(ItemsSource), returnType: typeof(IList<string>), declaringType: typeof(NativePicker), defaultValue: new List<string>()); public IList<string> ItemsSource { get => (IList<string>)GetValue(ItemsSourceProperty); set => SetValue(ItemsSourceProperty, value); } public static readonly BindableProperty SelectedItemProperty = BindableProperty.Create(propertyName: nameof(SelectedItem), returnType: typeof(string), declaringType: typeof(NativePicker), defaultValue: string.Empty, defaultBindingMode: BindingMode.TwoWay); public string SelectedItem { get => (string)GetValue(SelectedItemProperty); set => SetValue(SelectedItemProperty, value); } public static readonly BindableProperty KindProperty = BindableProperty.Create(propertyName: nameof(Kind), returnType: typeof(NativePickerStyle), declaringType: typeof(NativePicker), defaultValue: NativePickerStyle.Menu); public NativePickerStyle Kind { get => (NativePickerStyle)GetValue(KindProperty); set => SetValue(KindProperty, value); } } -
Add handler to invoke bound MAUI native control. Add Mapper for binding properties: SelectedItem, Title and Kind. These are the ones that need dynamic updates after the view is created.
 public class NativePickerHandler() : ViewHandler<NativePicker, UIView>(Mapper)
 {
     private PickerBridge? _bridge;

     public static PropertyMapper<NativePicker, NativePickerHandler> Mapper = new(ViewMapper)
     {
         [nameof(NativePicker.SelectedItem)] = MapSelectedItem,
         [nameof(NativePicker.Title)] = MapTitle,
         [nameof(NativePicker.Kind)] = MapPickerKind
     };

     protected override UIView CreatePlatformView()
     {
         _bridge = new PickerBridge(title: VirtualView.Title,
                                    items: VirtualView.ItemsSource,
                                    selected: VirtualView.SelectedItem,
                                    style: VirtualView.Kind,
                                    onSelectionChanged: s => DispatchQueue.MainQueue.DispatchAsync(() => VirtualView.SelectedItem = s));
         return _bridge?.UiView ?? new UIView();
     }

     public static void MapSelectedItem(NativePickerHandler handler, NativePicker view)
     {
         handler._bridge?.SetSelected(view.SelectedItem);
     }

     public static void MapTitle(NativePickerHandler handler, NativePicker view)
     {
         handler._bridge?.UpdateTitle(view.Title);
     }

     public static void MapPickerKind(NativePickerHandler handler, NativePicker view)
     {
         handler._bridge?.UpdateStyle(view.Kind);
     }
 }
Note:
onSelectionChangedcallback is important to make the binding TwoWay. I had some difficulty initially figuring this out. -
Register
NativePickerHandlerinMauiProgram#if IOS builder.ConfigureMauiHandlers(handlers => { handlers.AddHandler<NativePicker, NativePickerHandler>(); }); #endif -
Add
NativePickerin Xaml or C# and verify that it works.<Grid RowDefinitions="*,75, 125, 50" RowSpacing="8" Padding="16,32"> <ui:NativePicker Grid.Row="0" Title="Select Genre" ItemsSource="{Binding Genres}" SelectedItem="{Binding SelectedGenre, Mode=TwoWay}" Kind="{Binding SelectedPickerKind}" BackgroundColor="Transparent" /> <Label Grid.Row="1" Text="{Binding SelectedGenre, StringFormat='Selected genre: {0}'}" FontSize="16" HorizontalOptions="Center" HorizontalTextAlignment="Center" /> <ui:NativePicker Grid.Row="2" Title="Picker Kind Selection" ItemsSource="{Binding PickerKinds}" SelectedItem="{Binding SelectedPickerKindText}" Kind="Segmented" Margin="0,16,0,0" BackgroundColor="Transparent" /> <Label Grid.Row="3" Text="{Binding SelectedPickerKind, StringFormat='Selected Picker Kind: {0}'}" FontSize="12" HorizontalOptions="Center" HorizontalTextAlignment="Center" /> </Grid>